Get started with TrainerMate
Follow the narrated walkthrough, pause while you try each step, or use the illustrated guide beside the app.
For the current Windows release, 2.0.0. Example screens use fictional account and course details. Certificates are marked Coming soon in this release.
5 minutes 51 seconds · Natural British narration · Numbered highlights · Captions included
Choose a chapter to follow a particular step.
Your guide to every current function
Start with steps 1–6. Open any section below when you need a reminder. Free supports manual checks up to 3 weeks ahead; Pro adds automatic checks, a 12-week window and the calendar.
1. Install and open TrainerMate
Start with the official Microsoft Store version.
- Open the Download page. Visit trainermate.xyz/download.html and click Install TrainerMate.
- Finish installing. Follow the Microsoft Store prompts. Open Microsoft Store is an alternative route to the listing.
- Open the app. Use the Windows Start menu and search for TrainerMate. You can start on Free.
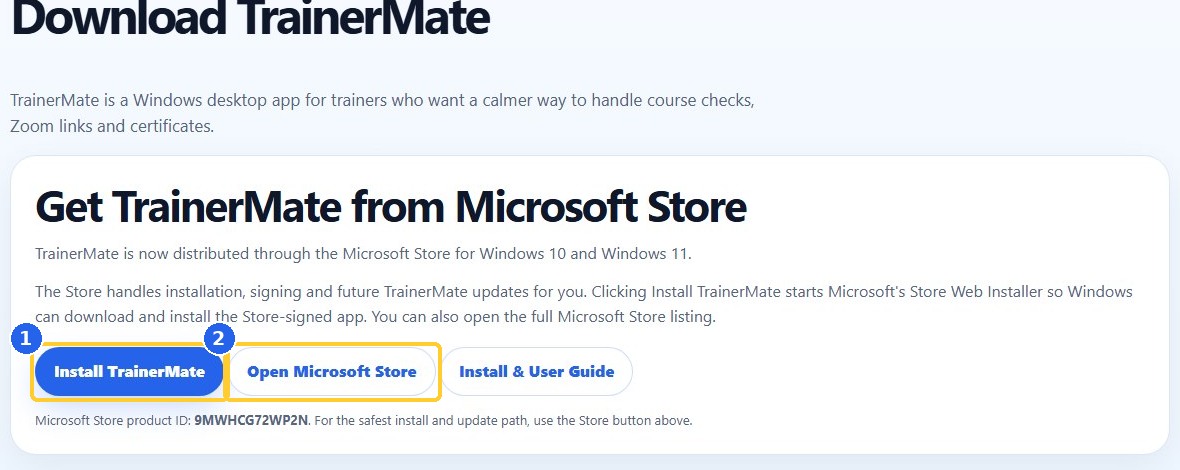
Microsoft Store signs and installs the app. Future approved app updates are delivered through the Store.
2. Create an account or log in
Your TrainerMate login is separate from Zoom and FOBS.
- Create free account. On the login screen, choose Create free account. Enter your own email address.
- Choose a password. Use at least 12 characters, including uppercase, lowercase, and a number or symbol.
- Confirm your email. Click the link in your confirmation email. Keep TrainerMate open so it can finish automatically.
- Already registered?. Choose Log in and use your registered email and TrainerMate password. Older accounts can use their existing TrainerMate ID.
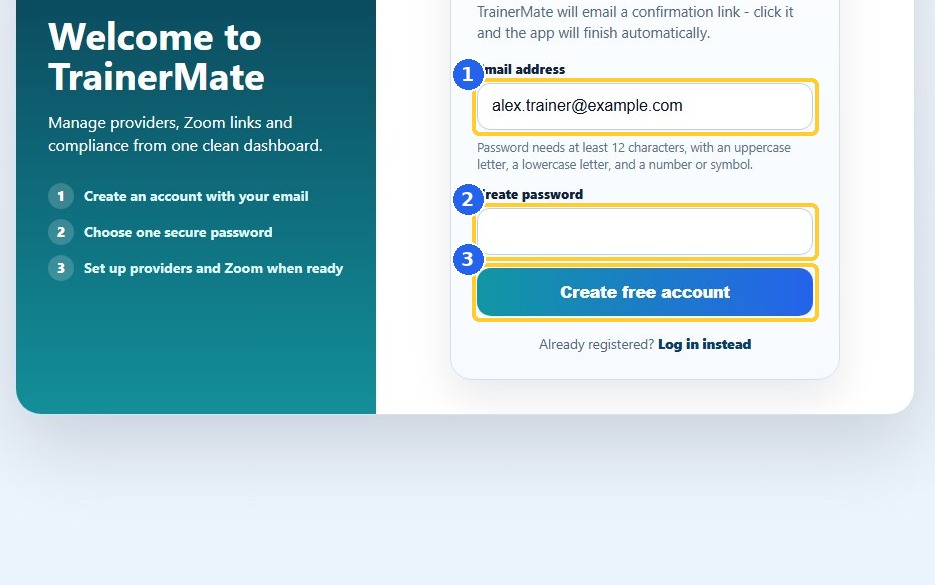
Check junk/spam if the email is missing. First sign-in can take longer while the account service starts. Wait for its reply before trying again.
3. Connect Zoom securely
Connect the account that hosts your training courses.
- Click Connect Zoom. TrainerMate opens the approval flow in your normal browser.
- Check the Zoom account. Sign in on Zoom’s own website. Make sure the account is the one you use for courses.
- Approve and return. Choose Allow or Approve. Return to TrainerMate and wait for the connected account to appear.
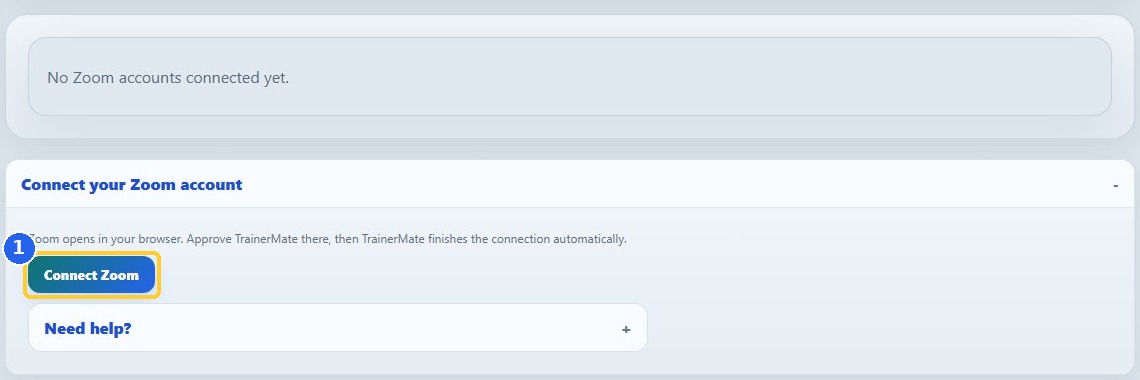
Your Zoom password belongs on Zoom’s own sign-in page. TrainerMate does not ask you to type it into the app.
4. One Zoom account or several
Connect every training account before assigning providers.
- Check the saved account. Look for Already connected beside the correct account.
- Add more if needed. Use Connect another Zoom account for any other account you deliver courses with.
- Continue to providers. Choose All connected - add a provider. Each provider will be paired with a specific saved Zoom account.
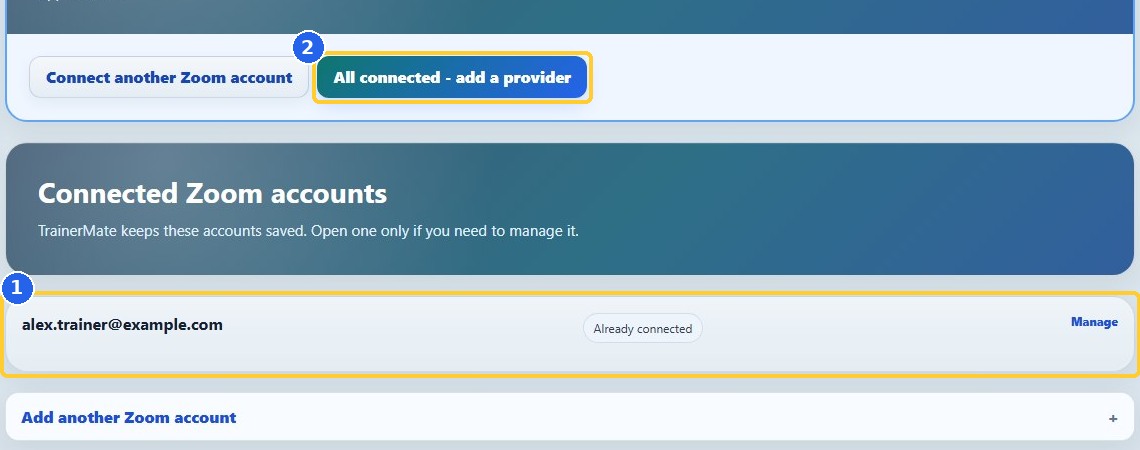
To reconnect later: Connections > Manage Zoom. Use Reconnect Zoom when offered. Removing an account keeps provider pairings saved, but you must select a usable account before checking courses.
5. Add and test a FOBS provider
Use the credentials you already use on the provider portal.
- Choose the provider. Select the organisation that supplies your courses from the Provider list.
- Choose its Zoom account. Pick the connected account that should host that provider’s courses.
- Enter the FOBS login. Enter the provider’s FOBS username and password. These are not your TrainerMate login details.
- Add and test. Click Add and test provider. Wait for success before adding another provider or starting a course check.
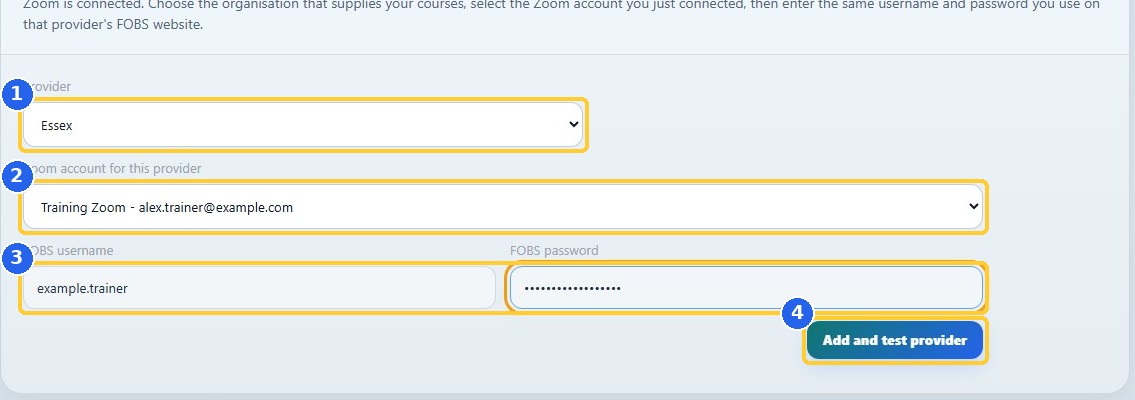
Add other providers through Connections > Add or manage providers. Some providers are read-only or supply their own Zoom links; respect the provider’s arrangement.
6. Run a first course check
Free checks up to 3 weeks ahead; Pro up to 12 weeks.
- Run the full check. On Dashboard, click Run full 3-week check on Free, or Run full 12-week check on Pro.
- Choose a smaller scan. Open Other scans. Choose a provider and an available date range, then click Run this check.
- Watch or stop if needed. Show FOBS window is optional for manual checks. Stop sync appears while a check is running.
- Read the result. Wait until the check finishes, then review any warnings and the course list.
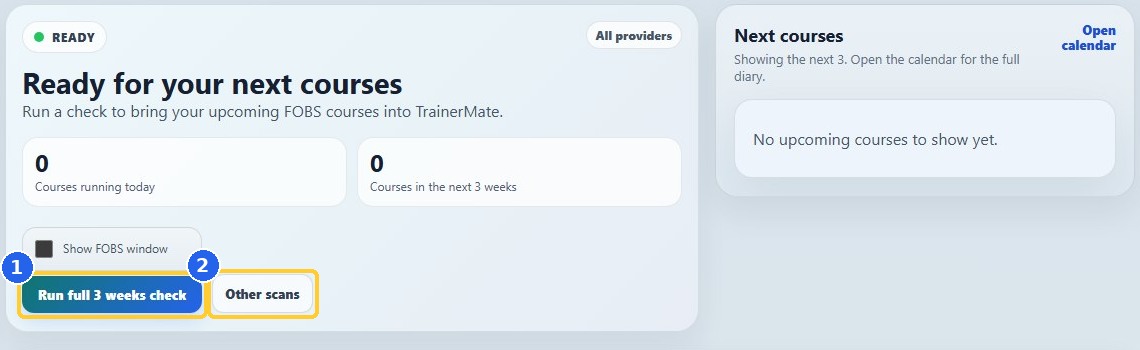
A check can create or update supported Zoom/FOBS joining details. Existing meetings are checked first. A provider that manages its own links is handled according to its settings.
7. Review courses and make decisions
The course list explains what is ready and what needs a look.
- Open the full list. Click Show all upcoming courses. Read the provider, course, date, time, status and notes.
- Check one affected course. Use Check course only when the button is offered. It applies to that selected course.
- Choose an existing meeting carefully. If a possible Zoom meeting is offered, choose Use this Zoom meeting only when it is definitely correct. Otherwise choose Create a new meeting.
- Confirm a removal carefully. Remove from TrainerMate is offered only in some cases. Use it only after confirming the course is no longer live in FOBS.
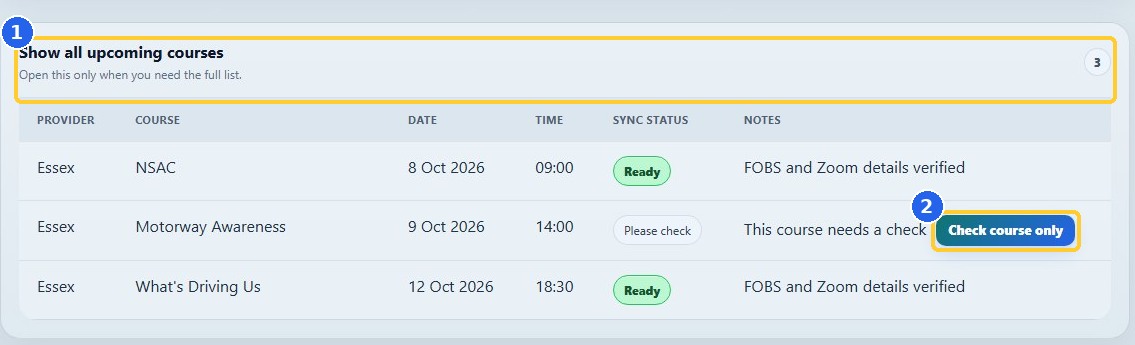
Ready is the result of the app’s checks, not a replacement for your final professional check. Confirm dates, joining details and provider requirements before delivery.
8. Manage connections and fix a login
Use Connections when a saved account needs attention.
- Manage Zoom or providers. Connections shows the account, Zoom and provider status. Open Manage Zoom or Add or manage providers.
- Update a provider login. Open the provider’s details, enter the correct FOBS credentials and click Save and test login.
- If a password expired. Change it on the provider’s FOBS website first. Then update and test it in TrainerMate.
- Check and repair. Run Check & Repair TrainerMate to check saved connections and refresh Zoom access. Use Copy report if support asks.
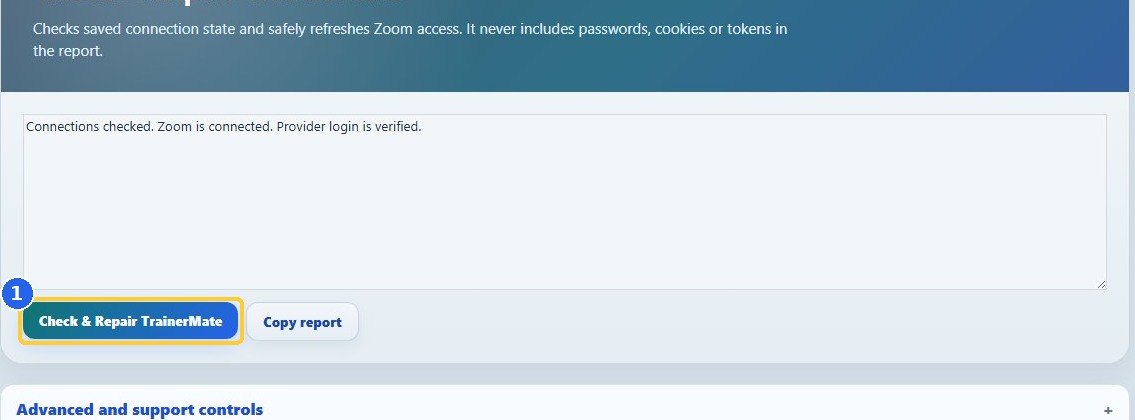
When a provider login fails, TrainerMate pauses that provider’s actions to avoid repeated failed logins. Fix the underlying login instead of repeatedly starting another check.
9. Pay for TrainerMate Pro
Optional upgrade: all three options give the same Pro access.
- Open Upgrade. Choose Upgrade in the sidebar, or See upgrade options in the account menu.
- Choose a plan. £5 one-month pass: one payment, no renewal. £5 monthly: renews each month. £40 annually: renews every 12 months.
- Complete secure payment. The app opens Stripe checkout in your browser. Confirm the plan and enter card details on Stripe only.
- Confirm Pro is active. Return to TrainerMate. If needed, wait a few moments and click Check plan now. If Pro is already active, do not buy it again.
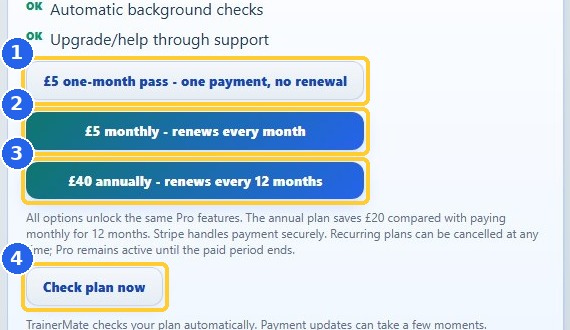
You can also pay via trainermate.xyz/pricing.html > Choose a secure payment option. Sign in with the same TrainerMate ID/email and password, then choose a plan. Do not create a second account.
10. Billing, cancellation and receipts
Manage payment without losing your saved setup.
- Manage Stripe billing. Open your Upgrade/account page and choose Manage Stripe billing when available.
- Cancel future renewal. Use Cancel renewal at period end. Pro continues until the paid period ends, then the account returns to Free.
- Understand the one-month pass. The one-month pass does not renew automatically. Buy another pass only when you need another paid month.
- Find receipts or a licence. Payment history offers receipts/invoices when available. If support gave you a licence key, use Activate licence rather than paying again.
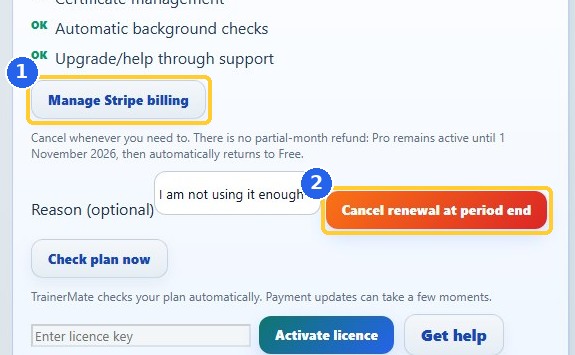
Cancellation does not refund the current paid period. Saved providers, Zoom pairings and settings are retained. Accounts with non-Stripe Pro access may not show Stripe management controls.
11. Turn on automatic checks (Pro)
Automatic updates means course checking, not installing app updates.
- Switch it on. Open Automatic updates and tick Automatically keep my courses up to date.
- Save the setting. Click Save automatic update settings. The status explains whether automatic checks are on.
- Keep the app running. TrainerMate must be open, with Pro active, and the PC awake and online.
- Start with Windows. Use the Start with Windows control if offered. If Windows controls the setting, check Windows Settings > Apps > Startup.
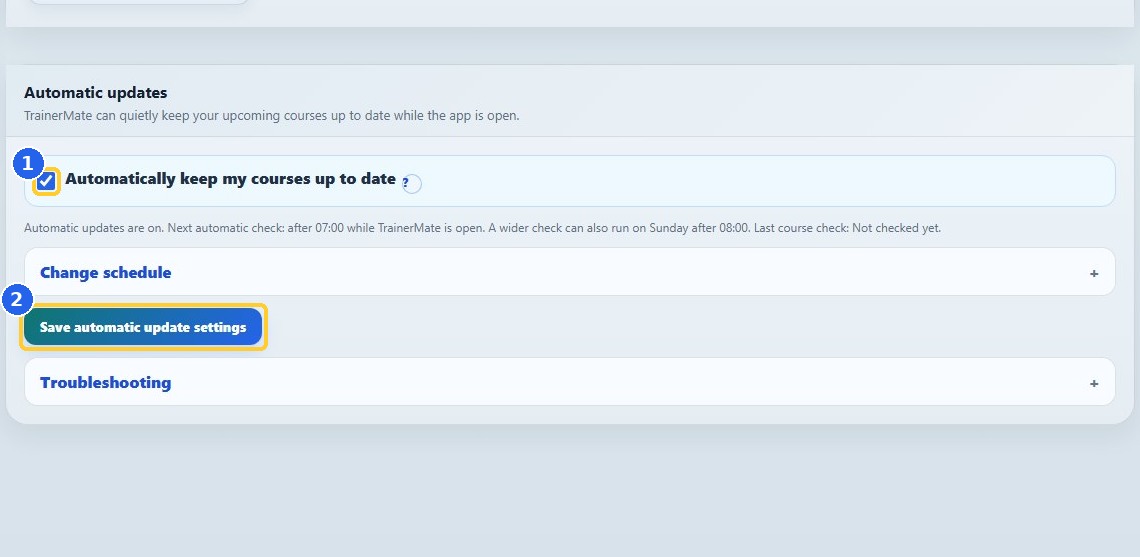
A closed app or sleeping/offline PC cannot perform a live provider check. Microsoft Store handles software updates separately.
12. Choose schedules and notifications
Open Change schedule only when you want to change the defaults.
- Daily light check. Choose the daily time and scope. A 14-day daily scope is recommended in the app.
- Weekly wider check. Choose the weekly day and time for a wider check, up to the Pro window.
- Choose notifications. Keep problem notifications on. Course changes, support messages and small pop-up bubbles are separate choices.
- Save and test. Save automatic update settings. Troubleshooting > Run quiet check now starts a background check using the saved settings.
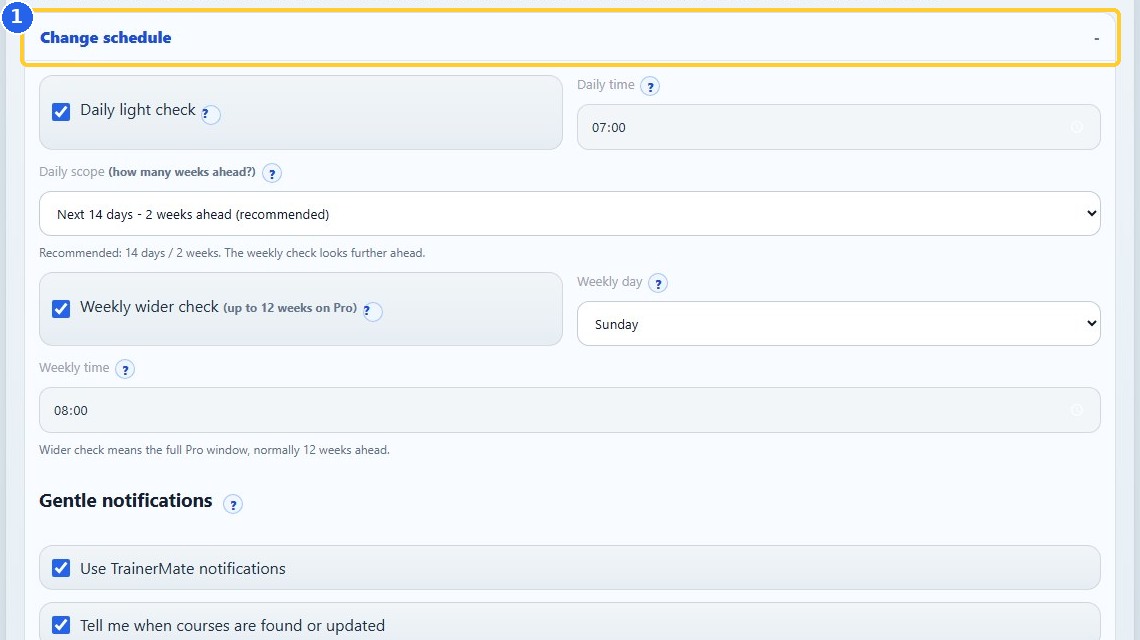
Scheduled checks run after the chosen time while TrainerMate is open. A missed check can run when the app next opens; it waits if another check is already running.
13. Use the calendar (Pro)
See the saved course diary and focus on what needs attention.
- Choose a view. Open Calendar. Use month, week or list view; This week is a quick route to the current week.
- Filter attention items. Please check focuses on courses needing attention. All courses restores the unfiltered view.
- Open a course. Select a calendar entry to see its details and the available provider/course tools.
- Refresh the underlying information. Run a Dashboard course check when you need fresh provider data. The calendar uses TrainerMate’s saved course records.
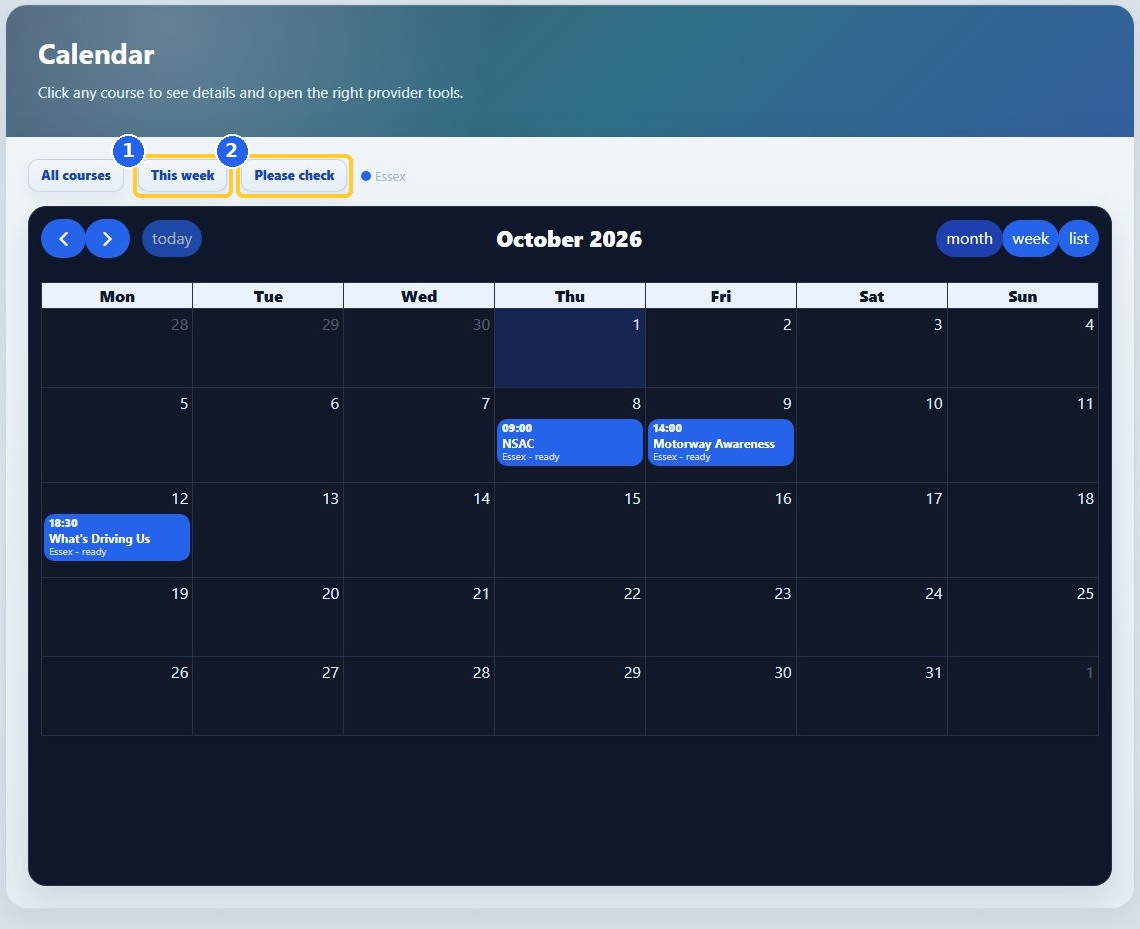
Provider colours help you distinguish courses. Initial calendar loading can take a few seconds. Free users can still review their course list on Dashboard.
14. Help, messages and diagnostics
Keep a support conversation together in one place.
- Send a message. Open Help. Enter a subject and explain the issue, including provider, course date and what you clicked. Choose Send.
- Read the reply. Return to the Message centre and open the conversation. Unread indicators highlight new replies.
- Keep your inbox tidy. Use Mark read or Archive when appropriate. Delete permanently removes a conversation from your inbox.
- Share useful diagnostics. Open Support details and diagnostics only if support asks. Use the app version and a connection report to explain the problem.
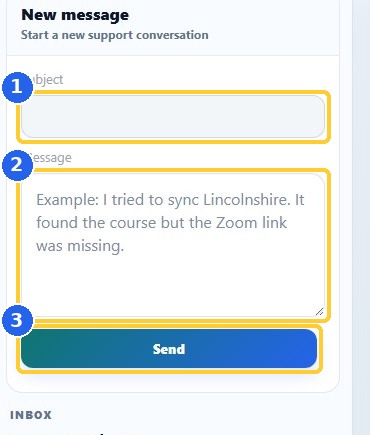
Never send passwords, login codes, tokens or payment card details. You can also email [email protected]. Avoid screenshots containing unnecessary delegate information.
15. Accounts, updates and what’s next
Keep setup simple after the first run.
- Remember me and log out. The account menu at the top right contains Remember me on this computer and Logout. Use Remember me only on a computer you trust.
- Reset a forgotten password. On the login screen, choose Forgot password? Enter the registered email and follow the one-time reset-code instructions. The code expires after 15 minutes.
- Update the app. Open Microsoft Store and check for app updates. Store installations do not use a separate TrainerMate installer update.
- Certificates are coming soon. In release 2.0.0, Certificates is disabled and marked Coming soon. Continue using your provider’s own portal for certificate tasks until the feature is released.
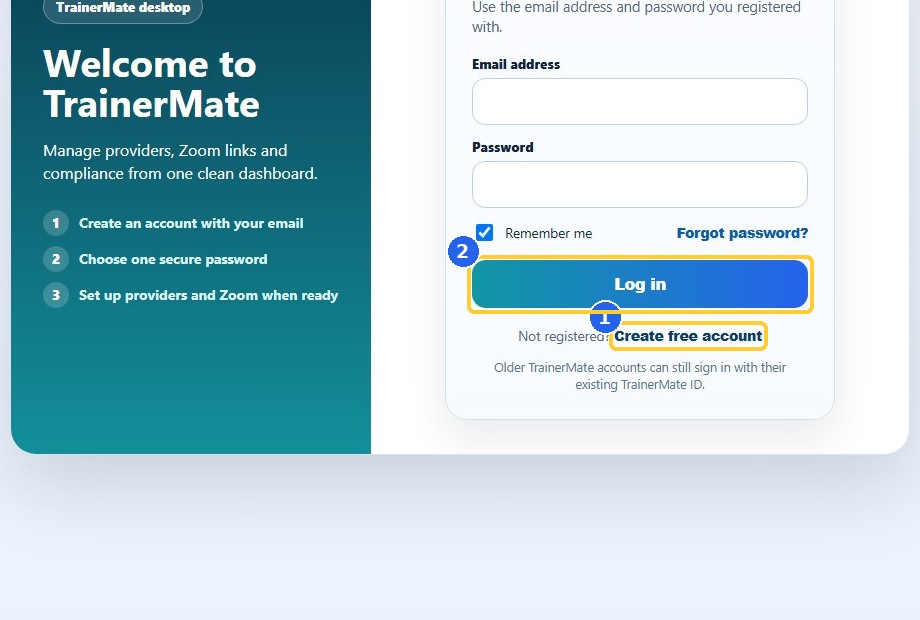
If setup or payment takes longer than expected, check your connection and read the on-screen message. Do not register or pay repeatedly. Use Connections or Help for a persistent problem.
Read the complete video transcript
Let’s get you started
Welcome to TrainerMate. This short guide takes you from installing the app to checking your first courses. We will also show you how to pay for Pro, and where to find help. Pause the video whenever you need to, and follow along at your own pace.
Install TrainerMate
Start on the TrainerMate website and open the Download page. Choose Install TrainerMate. Windows will take you through the official Microsoft Store installation. If you prefer, use Open Microsoft Store to view the full listing. Once installation has finished, open TrainerMate from your Windows Start menu. Installing the app is free.
Create your free account
On the login screen, choose Create free account. Enter your email address and choose a password with at least twelve characters, an uppercase letter, a lowercase letter, and a number or symbol. Click Create free account, then check your email and click the confirmation link. Leave TrainerMate open: it will finish automatically. Already registered? Log in with your existing TrainerMate email and password.
Connect the right Zoom account
TrainerMate guides you through setup in order. First, click Connect Zoom. Your web browser opens Zoom’s own secure approval page. Sign in to the Zoom account you use to deliver courses, check that you have the right account, and choose Allow or Approve. You never enter your Zoom password into TrainerMate. Return to the app and wait for the account to appear as connected.
Check your saved Zoom accounts
Your saved Zoom account should now say Already connected. If you use more than one Zoom account for training, connect each of them here before continuing. Then choose All connected, add a provider. Later, you will choose which Zoom account belongs to each provider, so it is worth getting this right now.
Add and test your provider
Choose the organisation that supplies your courses from the Provider list. Select the Zoom account you want TrainerMate to use for that provider. Then enter the same username and password you normally use on that provider’s FOBS website. These are your provider details, not your TrainerMate password. Click Add and test provider, and wait for the login check to finish. Add any other providers you use in the same way.
Run your first check
When setup is complete, the Dashboard opens. On Free, choose Run full three-week check. TrainerMate reads your upcoming courses, checks existing Zoom details, and prepares supported joining details where needed. Wait for the check to finish and read the result. Other scans lets you choose a particular provider. Pro can check up to twelve weeks ahead. Show FOBS window is optional if you want to watch a manual check.
Review what needs attention
Open Show all upcoming courses to see the full list. Read the status and notes beside each course. Ready means the saved checks look in order; Please check tells you where to look next. If a course offers Check course only, that button checks the selected course. If TrainerMate asks you to choose an existing Zoom meeting, confirm it really belongs to that course. Always make your final course and joining-details check before delivery.
Pay for Pro when you’re ready
You can get started on Free. When you want Pro, open Upgrade. The five-pound one-month pass is one payment with no renewal. The five-pound monthly plan renews each month. The forty-pound annual plan renews every twelve months. Choose the option you want, then complete payment on Stripe’s secure checkout. Return to TrainerMate. If Pro has not appeared yet, allow a few moments and choose Check plan now. Do not pay again just because activation is taking a moment.
Let Pro keep courses up to date
With Pro active, open Automatic updates. Tick Automatically keep my courses up to date, then save the settings. Change schedule lets you choose a small daily check and a wider weekly check, plus notifications. These checks run while TrainerMate is open and the computer is awake and connected. Start with Windows helps keep the app ready. This page controls course checks; Microsoft Store handles updates to the app itself.
See your courses in the calendar
Pro also includes Calendar. Use the month, week or list view to see your saved courses, or choose This week for a quick look at the week ahead. Please check focuses on courses needing attention. Select a course to see its details and available tools. The calendar shows what TrainerMate has saved, so run a course check when you need fresh provider information.
Get help without starting over
If something needs attention, open Connections to manage Zoom or your providers. Check and Repair TrainerMate can check saved connection state and refresh Zoom access. For support, open Help, enter a subject and a short message, then choose Send. Read replies in the same Message centre. Include the provider and course date, but never send passwords or card details. The downloadable PDF covers these steps in more detail.
You’re ready to get started
That is the essentials. Your account, Zoom connection and provider setup stay saved, so you do not need to repeat setup every day. Keep the PDF guide handy, and replay any chapter when you need a reminder. Certificates are coming soon in this released version. Happy training.